
This guide explains how to move, assign, or sync vendor memberships from the legacy membership layout into the new IMC Platform → Accounts interface.
Use this process when:
- A vendor was previously assigned a membership in the legacy layout
- You need to move a membership to IMC
- You need to sync an existing subscription so IMC recognizes it
- You need to assign a new membership manually to a vendor account
Accessing the Membership Tools
- Log in to the WordPress Admin.
- In the left navigation, go to IMC Platform → Accounts.
- Open the Memberships tab.
You will see two primary tools:
- Vendor Memberships — view existing memberships
- Create & Move Memberships — assign, move, or sync memberships
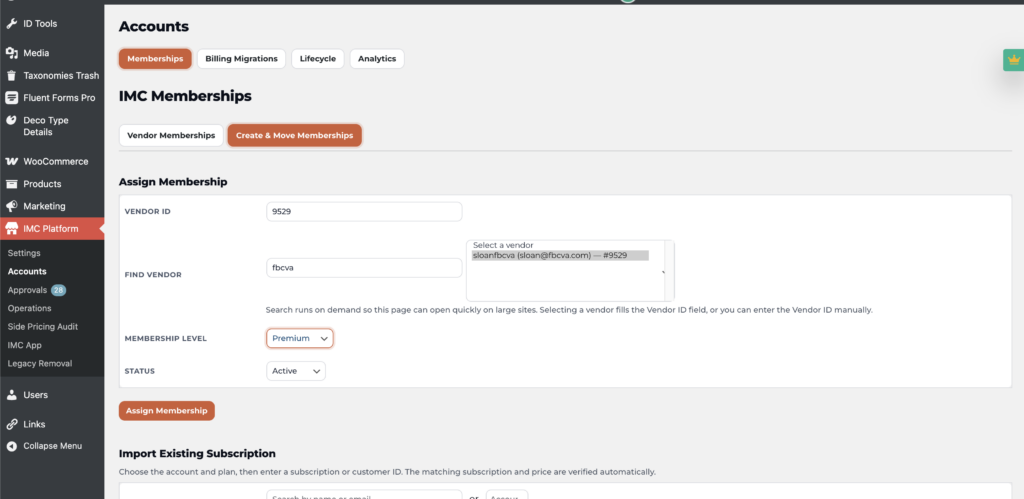
Move or Assign a Membership
Use this when a vendor needs to be added to the IMC membership system or moved from the legacy layout.
Steps
- Go to IMC Platform → Accounts → Memberships.
- Click Create & Move Memberships.
- In Find Vendor, search by:
- Vendor name
- Store name
- Email address
- Select the correct vendor from the search results.
- Confirm that the Vendor ID field is populated automatically.
- Choose the appropriate Membership Level.
- Set the Status (normally Active).
- Click Assign Membership.
Example
| Field | Example |
|---|---|
| Vendor ID | 9529 |
| Find Vendor | fbcva |
| Membership Level | Premium |
| Status | Active |
Slack link reference