
This guide outlines the complete workflow for processing customer orders from start to finish, covering both legacy (WordPress) and new (XE / Imprint Next) systems. It ensures consistent quality, correct file handling, and accurate synchronization across all platforms.
Tools Used
- Order Desk → Main order management platform
- WordPress (WooCommerce) → For legacy orders (Impact Merch / Church Shop)
- XE (Imprint Next) → For new system orders and product design
- Affinity Designer → Used for resizing or adjusting DTG designs
- Dropbox → For saving and linking design files
- Scalable Press → For embroidery digitization
Opening and Reviewing Orders
- In Order Desk, locate and open the order.
- Review customer details and check for any customer notes (top-right section).
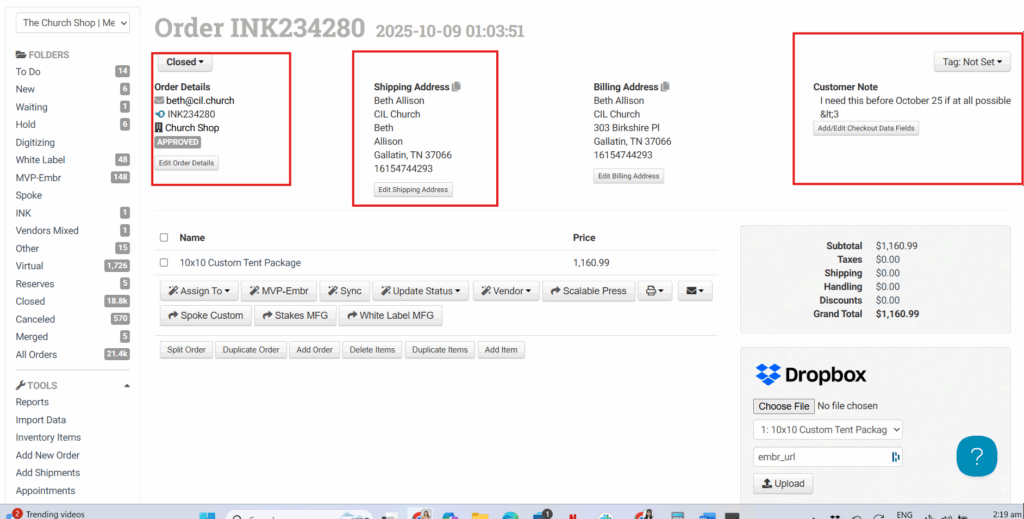
- Review:
- Item Name
- SKU / Item Code
- Ignore the blank section below SKU (system placeholder).
- Mark the order orange to indicate it’s In Progress.
- Copy the order number.
- If it’s an “IM” order, remove the “IM” prefix when searching.
Retrieving Order Files
A. WordPress (Old System Orders)
- Go to WooCommerce → Orders (check if Impact Merch or Church Shop site).
- Paste the order number into the search bar and open the order.
- Download:
- PNG (for design preview)
- SVG (for resizing and export)
- Open Edit Design in a new tab to check design dimensions.
B. XE / Imprint Next (New System Orders)
- Log in to XE (Imprint Designer).
- Search by order number and open the order.
- Review available details:
- PNG file
- Print Method (DTG, Embroidery, etc.)
- Print Side (Front / Back)
- Dimensions
- Download PNG → Rename using SKU.
- Save file in Dropbox → Church Shop Designs.
Preparing the Design (Affinity Workflow)
(For orders that require resizing or adjustment — usually WordPress/old system orders)
- Open Affinity Designer → navigate to Product Design Templates.
- Select the correct template:
- 4×4 Template – Stickers
- 14×15 Template – DTG / Shirt designs
- Drag and drop the SVG file into the template.
- Press V (Transform Tool) → lock aspect ratio → resize based on template.
- DTG (14×15): Set width to 14 inches
- Stickers: Follow size from Edit Design
- Align to center and middle.
- Hide guides before export.
- Verify size and layout match Edit Design dimensions.
Exporting Design Files
- Export file as PNG (
Ctrl + Shift + Eon Windows). - Use SKU as the filename.
- Save to:
- Dropbox → Impact Merch Order Designs, or
- Dropbox → Church Shop Designs (depending on client).
- Ensure the design resolution and colors are accurate.
Adding Item to Inventory
- In Order Desk, go to Inventory Items → Add Print on Demand.
- Fill in details:
- Item Name & SKU: Copy from Order Desk.
- Part Number: Keep only the product type (e.g., “DTG Shirt,” “Die Cut Sticker”).
- Print URL:
- Search Dropbox for the SKU file.
- Right-click → Copy Dropbox Link.
- Paste into the Print URL field.
- For DTG shirts → set Print Location: Full Front.
- For stickers → keep default dropdown settings.
- Click Add Item to save.
Syncing with Order Desk
- Return to the order in Order Desk.
- Scroll to bottom-right → click Sync Item Details with Inventory.
- This updates the SKU, inventory location, and print URL.
- Review the synced data for accuracy.
Processing Embroidery Orders (Scalable Press)
- If the order includes embroidery items, process separately:
- Select embroidery item → click Split Order.
- A new order will be created (suffix “-S1”).
- Download PNG for embroidery design.
- In Scalable Press:
- Upload the artwork → rename with Church name.
- Select Thread Count (based on color count).
- Choose Material (e.g., unstructured cap).
- Input dimensions from Edit Design.
- Wait for digitization (~3 days). Once completed:
- The DST file is generated.
- Add design in Scalable → select Placement (e.g., Hat Front) → Save.
- Copy the Artwork ID.
- In Order Desk → Add Print on Demand → paste Artwork ID under Print URL.
- No need to adjust location for embroidery.
- Save and Sync Item Details again.
Final Review
- Open the order in Order Desk.
- Change status from Orange → New once all checks are complete.
- Click the Print URL to open the design and verify:
- Correct file and link
- High resolution and color accuracy
- Correct print placement (Front, Back, Hat Front, etc.)
- Ensure the correct folder (Impact Merch or Church Shop) was used.
- Confirm no duplicate sends never click “Send Order” twice.
- For rush or flagged orders, review customer notes and notify Clopress if prioritization is needed.
Notes & Reminders
- Always check customer notes before processing.
- Template size must match order specs (e.g., 4×4 sticker, 14×15 DTG).
- Use SKU as the consistent filename for Dropbox uploads.
- Sync inventory details before changing status to New.
- Quality check every design (resolution, color, placement).
- WordPress (Old) = Requires Affinity prep.
- XE (New) = Direct PNG download (no Affinity needed).
- DTG = Always use 14×15 template.
- Embroidery = Handled via Scalable digitization.
- Confirm all links, SKUs, and print locations before sending to printers.